How to resize a XP virtual hard disk in Parallels
So on my lovely MacBook Pro, I occasionally have to run some windows programs.
To do this I do not use the much talked about Apple BootCamp, I use a very good program called Parallels. This provides me with the ability to run a windows program whilst I am in OSX.
Recently I ran out of disk space and was forced to resize the Virtual HDD that the Windows sits on. Luckily Parallels ships with a utility to do this call “Paralells Image Tool”. So I dutifully ran it, added an extra 8 gig to the image size, and then “rebooted” my virtual machine.
Usual Word of warning: Always back up your files before attempting anything like this.
The HDD in windows still showed the old size. You see, windows still only saw the first 8 Gb of the hard disk, the rest was seen as unpartitioned space. It turns out the parallels image tool resizes the virtual disk, but leaves the extending partitioning up to you. It would be nice if it read the partition table in the virtual hard disk and prompted you with a few options, but it did not, so there you go.
As I could not find my Norton Partition Magic CD, I had to manually extend the partition in windows, not the most complex step ever but a pain none the less.
First I looked at the settings for my virtual machine and located the ImageFile:
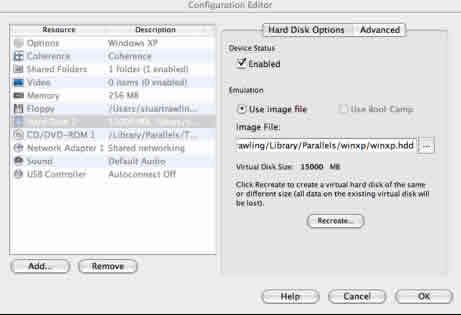
I saw the Image File was located in /Users/*Username*/Library/Parallels/winxp/
In this folder I copied the hdd file (called winxp.hdd on my machine) to winxp1.hdd. This might take a while depending on the size of your virtual hard disk. You should ensure you have enough disk space before you begin aswell.
Once I had a copy I added this as a new virtual hdd:

Upon booting windows, XP recognized the new disk. After the new hardware is “installed and ready to use”, drop down to a command prompt (Start -> Run , and then type cmd and press enter).
At the command prompt run DISKPART, and then type “list volume”:
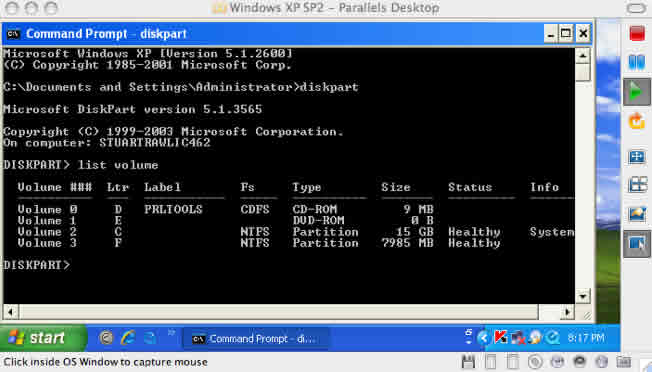
You will notice a new partition (not the one marked as System in the Info column). Select this volume by typing “select volume X” and press enter, where X is the volume listed in the second column. In my case I typed “select volume 3”.
Then, after the volume is selected type “extend” and hit enter.
After the operation is complete, you need to shutdown the virtual machine, and go back into the configuration of the vm. Then remove the new Hard Disk you just resized from the configuration, and edit the Hard Disk 1 to point to the newly resized hdd file.
With this change, boot into Windows again, and you should see the drive with the proper size. You may be asked to reboot to allow the changes to the hardware to take effect. If after rebooting everything looks normal, then it should be safe to delete the original hdd file – be sure to remove the correct one!
Et voila, your Parallels XP disk is the new size, with minimal effort and inconvenience.
